Mood?
Dreamwidth moods are the words like "angry," "sad," "happy" and so on you see at the bottom of your text edit box and (generally) below your entries, denoting the mood associated with the post. A mood theme is a set of static or animated images (up to 100 by 100 pixels) to visually differentiate these moods.
As far as I can tell there's very little documentation of Dreamwidth mood themes, especially how to customize them, so I thought I'd give a little rundown of how to set mood themes in Dreamwidth, from the basics of switching to a different public mood theme (available to all account levels) to creating and editing custom moods (paid account and above). As a bonus I'll also provide my own mood theme that you can install easily from the admin console.
Changing your mood icon set
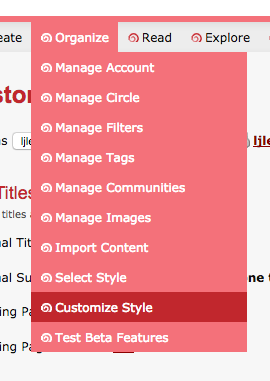
If you want to change your mood icons, whether to one of the publicly available ones or to customize your own, go to the Organize tab and select Customize Style.
Select "Display" from the tabs on the left and you'll find the Mood Themes right on the top of the page. You can select a mood theme from the dropdown menu here and click the "Save Changes" button at the bottom to apply the change.
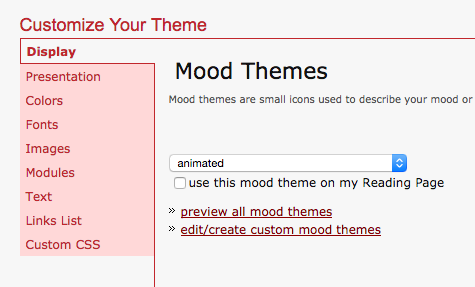
If you want a more detailed look at the mood themes, you can click through to "preview all mood themes" and get a more detailed view of what the icons look like. You'll only get a selection of icons for "happy," "sad," "angry," and "tired" for the themes, since the full range of moods is quite extensive. You can select other moods from the drop-down menus on top and get a sample of other moods.
If you want to see one theme in more depth you can click through to "view all" on the right of any row of icon samples, where you'll see all the mood icons in alphabetical order by mood name, from "accomplished" to "worried."
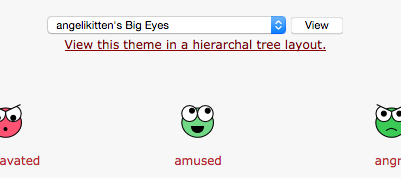
While you're in "view all" mode, you can also look at the icons in a hierarchical tree layout by clicking the link under the dropdown menu. What this means is that moods are arranged in a hierarchy, with for instance "angry" being a top-level mood with "aggravated," "annoyed," "bitchy" etc. being lower-level moods under "angry." This also means, in practice, that you can inherit icons from a top-level mood, something that's available in the GUI mood them editor.
Creating and editing custom mood themes
If you want a mood theme of your own with custom icons, you can go back to the Organize >> Customize Style >> Display menu as above and click through to "edit/create custom mood themes" below the "preview all mood themes" link. If you have a paid account or above you can create a new mood theme and edit, delete, or switch between your mood themes. You'll also need a hosting service where you have your mood icons uploaded.
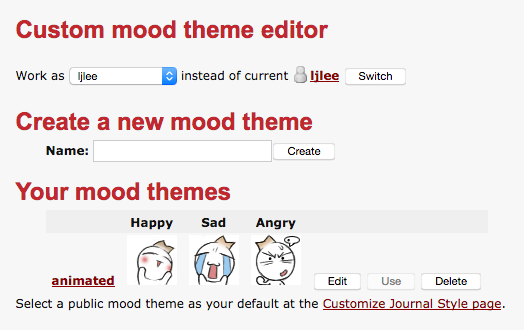
To create a mood theme, you enter the theme's name and click create. You can then fill in your icons for each mood using the custom mood theme editor, consisting of each icon's url, width, and height. You can change or add icons to an existing custom mood theme by clicking "edit" next to your custom mood themes.
Editing custom mood themes using the administration console
The GUI mood theme edit screen is all very well and good if you're willing to tab through the text boxes for 132 moods to set the url, width, and height of each. It's easier if your icons are the default 100px by 100px, but if not you have a whoooole lot of typing ahead of you. It's useful for, say, changing a few icons in a pre-installed theme, but for installing a mood theme from scratch I found it more trouble than it's worth. Evidently this problem was even more acute in LiveJournal, which Dreamwidth is code-forked from, because the editor was very teperamental and frequently crashed the browser.
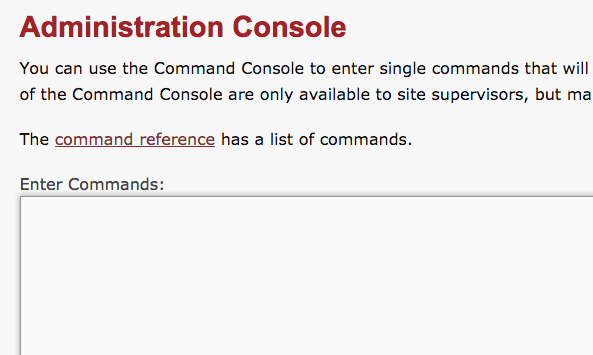
Here's where we come to arcane knowledge from the LiveJournal days: You can also set mood theme icons through text commands in the administration console without going through the GUI screen. This works pretty much like a computer terminal screen, where you enter text commands and run them.
Even more conveniently for this particular purpose, the commands here don't have to be line by line--you can enter a bunch of command lines, say, 132 of them, and then click "Execute" to run them all at once.
As far as I know there is no menu item leading to the admin console. You can follow this link https://www.dreamwidth.org/admin/console/ to access it.
Just feel that forbidden energy!
Don't worry too much about messing things up. As the instructions helpfully note, some commands are only executable by site admins so there's little chance you could break something site-wide. Setting custom mood theme icons is definitely a thing you can do at user level, and it doesn't hurt anything. I just personally find it more convenient than using the GUI screen, and you might too.
Step-by-step instructions for setting a mood theme from the console
First, you need to create your custom mood theme so you have a theme to modify and populate with icons. You can do that in the admin console with the following command, also given to you in the commands reference linked above the console:
moodtheme_create <name> <desc>
You don't actually use the pointy brakets in the commands, those just denote necessary arguments for the command. So, for instance, a mood creation command can look something like this:
moodtheme_create "LJ's Moods" "Here are my moods"
Hit execute, and you will see something like this above the console:
If you don't want te mess with the console for this part of the process, you can go to the "edit/create custom mood themes" screen from above and create the theme from the GUI. You can't immediately see the mood theme ID from here, but what you can do is go back to the Mood Themes menu from Organize >> Customize Style >> Display, then select your mood theme from the dropdown menu and click the "View all" link to the right of the icons preview. The URL of the mood theme page will look something like this:
https://www.dreamwidth.org/moodlist?moodtheme=1234
The moodtheme value from the url, 1234 in this case, is the mood theme ID you need.
Second, copy the commands in the text box below into a text file of your own.
Here is a breakdown of the command, taken from the command reference:
moodtheme_setpic <themeid> <moodid> <picurl> <width> <height>
The first part, moodtheme_setpic is the command. The themeid (and again, no pointy brackets will be used in the actual command) shows which theme we are setting pics for. The moodid shows which mood within the theme we are setting the icon for, for instance moodid 90 is for "accomplished," etc. The picurl is the URL of the icon's actual image file. Width and height denote the width and height of the icon in pixels. Now that you know what each part does, you can modify them for your own theme.
Now third, replace each instance of themeid with the ID number of your mood theme. Search and replace all is the most convenient way to do this, obviously.
Fourth, if your icons are not 100 pixels by 100 pixels in size, replace those as well. Mine were 50 by 50 so I searched-and-replaced each instance of "100 100" with "50 50". 100 by 100 is also the maximum size of the icons, as noted above.
Fifth, and here's the finicky part that just can't be made easier, replace each instance of picurl with the url of the image file you want to use. I have put the corresponding moods in the line for each moodid, accomplisheURL, aggravatedURL etc. etc. for your convenience. (You can also check which mood label corresponds to which moodid number by viewing any theme in hierarchical tree view) So, if there is an icon that you want to use for your happy mood, paste the image file's url into the happyURL spot. You can use the same icon for multiple moods as well.
Sixth, run the command lines in the admin console by selecting them all, copy and pasting them into the console, and hitting Execute! If all went well, you will get the green confirmation text showing you successfully set the icons for each mood in your theme.
Bonus: The mood theme I use
If you want to easily install the mood icons I use, you can use the commands below from the admin console:
(Note: The icons are not of my own creation, but from a pack that I downloaded years ago. I've seen icons from this set being used here and there and I'm pretty sure they are Japanese in origin, but otherwise I don't know who to credit so if you know who the artist is I would appreciate the info. Edit 11/26/20: As was pointed out in the comments, this is Onion Head Taiwanese artist Ethan Liu! Thank you kindly![[personal profile]](https://www.dreamwidth.org/img/silk/identity/user.png) cashew for the info!)
cashew for the info!)
You will need to follow steps 1 to 3 above by creating a new theme, noting down the ID of the theme, then search-and-replacing "themeid" in your text file with the actual ID number. Once that is done, paste the command lines into the console, hit execute and you're done.
I hope this has been a useful guide to moods, and particularly customizing mood themes! Enjoy!
Dreamwidth moods are the words like "angry," "sad," "happy" and so on you see at the bottom of your text edit box and (generally) below your entries, denoting the mood associated with the post. A mood theme is a set of static or animated images (up to 100 by 100 pixels) to visually differentiate these moods.
As far as I can tell there's very little documentation of Dreamwidth mood themes, especially how to customize them, so I thought I'd give a little rundown of how to set mood themes in Dreamwidth, from the basics of switching to a different public mood theme (available to all account levels) to creating and editing custom moods (paid account and above). As a bonus I'll also provide my own mood theme that you can install easily from the admin console.
Changing your mood icon set
If you want to change your mood icons, whether to one of the publicly available ones or to customize your own, go to the Organize tab and select Customize Style.
Select "Display" from the tabs on the left and you'll find the Mood Themes right on the top of the page. You can select a mood theme from the dropdown menu here and click the "Save Changes" button at the bottom to apply the change.
If you want a more detailed look at the mood themes, you can click through to "preview all mood themes" and get a more detailed view of what the icons look like. You'll only get a selection of icons for "happy," "sad," "angry," and "tired" for the themes, since the full range of moods is quite extensive. You can select other moods from the drop-down menus on top and get a sample of other moods.
If you want to see one theme in more depth you can click through to "view all" on the right of any row of icon samples, where you'll see all the mood icons in alphabetical order by mood name, from "accomplished" to "worried."
While you're in "view all" mode, you can also look at the icons in a hierarchical tree layout by clicking the link under the dropdown menu. What this means is that moods are arranged in a hierarchy, with for instance "angry" being a top-level mood with "aggravated," "annoyed," "bitchy" etc. being lower-level moods under "angry." This also means, in practice, that you can inherit icons from a top-level mood, something that's available in the GUI mood them editor.
Creating and editing custom mood themes
If you want a mood theme of your own with custom icons, you can go back to the Organize >> Customize Style >> Display menu as above and click through to "edit/create custom mood themes" below the "preview all mood themes" link. If you have a paid account or above you can create a new mood theme and edit, delete, or switch between your mood themes. You'll also need a hosting service where you have your mood icons uploaded.
To create a mood theme, you enter the theme's name and click create. You can then fill in your icons for each mood using the custom mood theme editor, consisting of each icon's url, width, and height. You can change or add icons to an existing custom mood theme by clicking "edit" next to your custom mood themes.
Editing custom mood themes using the administration console
The GUI mood theme edit screen is all very well and good if you're willing to tab through the text boxes for 132 moods to set the url, width, and height of each. It's easier if your icons are the default 100px by 100px, but if not you have a whoooole lot of typing ahead of you. It's useful for, say, changing a few icons in a pre-installed theme, but for installing a mood theme from scratch I found it more trouble than it's worth. Evidently this problem was even more acute in LiveJournal, which Dreamwidth is code-forked from, because the editor was very teperamental and frequently crashed the browser.
Here's where we come to arcane knowledge from the LiveJournal days: You can also set mood theme icons through text commands in the administration console without going through the GUI screen. This works pretty much like a computer terminal screen, where you enter text commands and run them.
Even more conveniently for this particular purpose, the commands here don't have to be line by line--you can enter a bunch of command lines, say, 132 of them, and then click "Execute" to run them all at once.
As far as I know there is no menu item leading to the admin console. You can follow this link https://www.dreamwidth.org/admin/console/ to access it.
Just feel that forbidden energy!
Don't worry too much about messing things up. As the instructions helpfully note, some commands are only executable by site admins so there's little chance you could break something site-wide. Setting custom mood theme icons is definitely a thing you can do at user level, and it doesn't hurt anything. I just personally find it more convenient than using the GUI screen, and you might too.
Step-by-step instructions for setting a mood theme from the console
First, you need to create your custom mood theme so you have a theme to modify and populate with icons. You can do that in the admin console with the following command, also given to you in the commands reference linked above the console:
moodtheme_create <name> <desc>
You don't actually use the pointy brakets in the commands, those just denote necessary arguments for the command. So, for instance, a mood creation command can look something like this:
moodtheme_create "LJ's Moods" "Here are my moods"
Hit execute, and you will see something like this above the console:
Success. Your new mood theme ID is 1234Take down that mood theme ID, 1234 in this case, because you're going to need it to modify your mood theme from the console.If you don't want te mess with the console for this part of the process, you can go to the "edit/create custom mood themes" screen from above and create the theme from the GUI. You can't immediately see the mood theme ID from here, but what you can do is go back to the Mood Themes menu from Organize >> Customize Style >> Display, then select your mood theme from the dropdown menu and click the "View all" link to the right of the icons preview. The URL of the mood theme page will look something like this:
https://www.dreamwidth.org/moodlist?moodtheme=1234
The moodtheme value from the url, 1234 in this case, is the mood theme ID you need.
Second, copy the commands in the text box below into a text file of your own.
Here is a breakdown of the command, taken from the command reference:
moodtheme_setpic <themeid> <moodid> <picurl> <width> <height>
The first part, moodtheme_setpic is the command. The themeid (and again, no pointy brackets will be used in the actual command) shows which theme we are setting pics for. The moodid shows which mood within the theme we are setting the icon for, for instance moodid 90 is for "accomplished," etc. The picurl is the URL of the icon's actual image file. Width and height denote the width and height of the icon in pixels. Now that you know what each part does, you can modify them for your own theme.
Now third, replace each instance of themeid with the ID number of your mood theme. Search and replace all is the most convenient way to do this, obviously.
Fourth, if your icons are not 100 pixels by 100 pixels in size, replace those as well. Mine were 50 by 50 so I searched-and-replaced each instance of "100 100" with "50 50". 100 by 100 is also the maximum size of the icons, as noted above.
Fifth, and here's the finicky part that just can't be made easier, replace each instance of picurl with the url of the image file you want to use. I have put the corresponding moods in the line for each moodid, accomplisheURL, aggravatedURL etc. etc. for your convenience. (You can also check which mood label corresponds to which moodid number by viewing any theme in hierarchical tree view) So, if there is an icon that you want to use for your happy mood, paste the image file's url into the happyURL spot. You can use the same icon for multiple moods as well.
Sixth, run the command lines in the admin console by selecting them all, copy and pasting them into the console, and hitting Execute! If all went well, you will get the green confirmation text showing you successfully set the icons for each mood in your theme.
Bonus: The mood theme I use
If you want to easily install the mood icons I use, you can use the commands below from the admin console:
(Note: The icons are not of my own creation, but from a pack that I downloaded years ago. I've seen icons from this set being used here and there and I'm pretty sure they are Japanese in origin, but otherwise I don't know who to credit so if you know who the artist is I would appreciate the info. Edit 11/26/20: As was pointed out in the comments, this is Onion Head Taiwanese artist Ethan Liu! Thank you kindly
You will need to follow steps 1 to 3 above by creating a new theme, noting down the ID of the theme, then search-and-replacing "themeid" in your text file with the actual ID number. Once that is done, paste the command lines into the console, hit execute and you're done.
I hope this has been a useful guide to moods, and particularly customizing mood themes! Enjoy!
